

It’s 3pm on a Tuesday. Your neck feels like it’s made of concrete, your shoulders are practically touching your ears, and you’ve just realized you haven’t moved from this exact position in three hours. Sound familiar?
If you’re nodding along (carefully, given that neck situation), you’re not alone. The average office worker spends 1,700 hours per year hunched over their desk, and most of us accept the daily discomfort as just part of the job. But here’s the thing: transforming your workspace from a pain factory into an ergonomic haven doesn’t require a complete office overhaul or a hefty equipment budget.
In fact, you can revolutionize your desk setup in just 10 minutes.

Why Most Ergonomic “Solutions” Fail
Before I dive into the reset, let’s address the elephant in the room. You’ve probably tried to “fix” your workspace before. Maybe you adjusted your chair height once, or propped your laptop on a stack of books. Yet here you are, still dealing with that familiar ache between your shoulder blades.
The problem isn’t that ergonomic principles don’t work—it’s that most people approach them backwards. Instead of making one big change and hoping for the best, the real solution lies in small, systematic adjustments that work together as a cohesive system.
That’s where the 10-minute desk reset comes in.
Your 10-Minute Transformation: Step by Step
Grab a timer and let’s do this together. Don’t skip steps or rush through—each minute builds on the last.
Minutes 1-2: The Foundation Check
Start with your chair, because everything else builds from here.
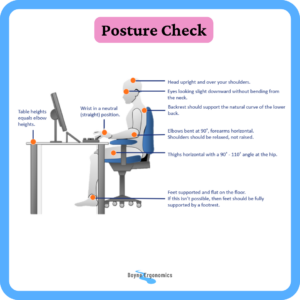
Chair Height: Sit all the way back in your chair. Your elbows should be level with the desk surface when the shoulders are relaxed. Your feet should be flat on the floor (or footrest), with your thighs parallel to the ground, or hips slightly higher than knees if that is comfortable for you. If your feet are dangling, get something to support them underneath. If your knees are higher than your hips, raise it up.
Back Support: Most people sit on the edge of their chair. Push yourself all the way back so your lower back is supported by the chair’s lumbar curve. If your chair doesn’t have one, a small pillow works perfectly.
Quick Posture Reset: Take a deep breath and imagine a string pulling you up from the crown of your head. Your ears should be directly over your shoulders, and your shoulders directly over your hips. This might feel strange at first—that’s normal.
Minutes 3-4: Keyboard & Mouse Optimisation
Now let’s address the tools you interact with most.
Keyboard Position: Your keyboard should be positioned so your elbows rest naturally at your sides, creating a 90-degree angle (or slightly more open). If you’re reaching up to type, you are too low for the keyboard surface (or it is too high). If your wrists are bent upward, you are too high for the keyboard surface (or is it too low).
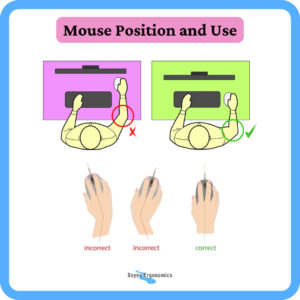
Mouse Placement: Your mouse should be at the exact same level as your keyboard, close enough that you don’t have to reach for it.
The Wrist Rule: Here’s something most people get wrong: your wrists should float above the keyboard and mouse, not rest on the desk edge. Resting your wrists creates pressure points and restricts blood flow. Let your arms do the work of supporting your hands.
Minutes 5-6: Screen Setup for Success
Your monitor setup can make or break your ergonomic efforts.
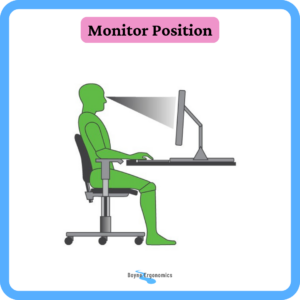
Screen Height: The top of your screen should be at or slightly below eye level. If you’re using a laptop, this probably means you need to raise it up. Books, a laptop stand, or even a sturdy box will work.
Distance Matters: Sit arm’s length away from your screen—about 20-26 inches. If you’re squinting to read text, increase the font size rather than leaning forward.
Screen Angle: Tilt your monitor back slightly, about 10-20 degrees. This reduces neck strain and minimizes glare from overhead lighting.
Minutes 7-8: Environment Optimisation
Small environmental changes create big comfort improvements.
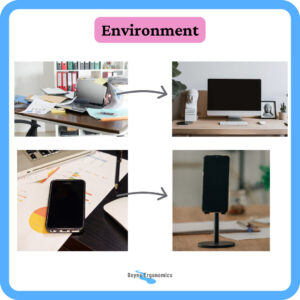
Declutter Your Reach Zone: Clear your desk of anything that forces you to stretch, twist, or strain. Everything you use regularly should be within easy arm’s reach.
Lighting Check: Position your screen perpendicular to windows when possible to minimize glare. If you’re straining to see your screen, adjust the brightness to match your surrounding environment—not too dim, not blazingly bright.
Phone Positioning: If you use your phone for work calls, position it where you can reach it without stretching. Place it on a phone stand. Better yet, use a headset or speakerphone to avoid the dreaded phone-shoulder squeeze.
Minutes 9-10: Movement and Calibration
The final step is making sure everything works together.
Quick Movement Break: Roll your shoulders backward five times, then gently turn your head left and right. This isn’t just stretching—you’re checking that your new setup allows for natural movement.
Test Drive: Spend the remaining time actually using your setup. Type a few sentences, move your mouse around, adjust your position. Everything should feel natural, not forced.
Set Your Reminder: Before you dive back into work, set a timer for 30-45 minutes. When it goes off, leave the desk for 2-3 minutes, come back, do a quick posture check and micro-adjustment.
The key is consistency. These adjustments work because they address the root causes of desk-related discomfort: poor posture, repetitive strain, and static positioning. By making small, regular corrections, you’re preventing problems before they become painful.
Common Mistakes That Sabotage Your Setup
Even with the best intentions, people often make these setup errors:
The Perfectionist Trap: Trying to maintain perfect posture all day is exhausting and counterproductive. Good ergonomics is about creating a setup that supports natural, comfortable positioning—not forcing yourself into a rigid pose.
The One-Size-Fits-All Fallacy: What works for your coworker might not work for you. People come in different shapes and sizes, so your ergonomic setup should be tailored to your body.
The Set-It-and-Forget-It Mistake: Your needs change throughout the day. What feels comfortable at 9am might need tweaking by 3pm. Build in regular check-ins with your setup.
Making It Stick: Beyond the 10-Minute Reset
The reset is just the beginning. Here’s how to maintain your ergonomic gains:
The 20-20-20 Rule: Every 20 minutes, look at something 20 feet away for 20 seconds. This simple habit reduces eye strain and encourages natural posture shifts.
Micro-Movements: Set a reminder to do small movements away from the desk every 30 – 45 minutes—shoulder rolls, neck stretches, or simply walking around.
Weekly Setup Reviews: Spend five minutes each Monday morning checking your setup. Sometimes things get moved over the weekend, or your needs change with new projects.
When to Consider Equipment Upgrades
While this reset works with whatever equipment you currently have, there are times when investing in new gear makes sense:
- If your current chair doesn’t adjust to the right height, a new chair or footrest might be necessary
- If you’re using a laptop as your primary computer, an external keyboard and mouse can be game-changers
- If you’re consistently experiencing pain despite proper setup, it might be time to consult with an ergonomic specialist
Your Workspace, Transformed
The beauty of the 10-minute desk reset isn’t just that it’s quick—it’s that it proves how small changes can create big improvements. You don’t need to spend hundreds of euros or wait for your company to approve new equipment. You just need to be intentional about how you set up and use your workspace.
So, are you ready to transform your 3pm slump into a 3pm stride? Set that timer, follow the steps, and prepare to discover what it feels like to work comfortably. Your neck, shoulders, and future self will thank you.
Remember: good ergonomics isn’t about creating the perfect setup once—it’s about building habits that support your body throughout your workday. Start with these 10 minutes, and watch how they ripple into hours of greater comfort and productivity.
The timer’s ready when you are.